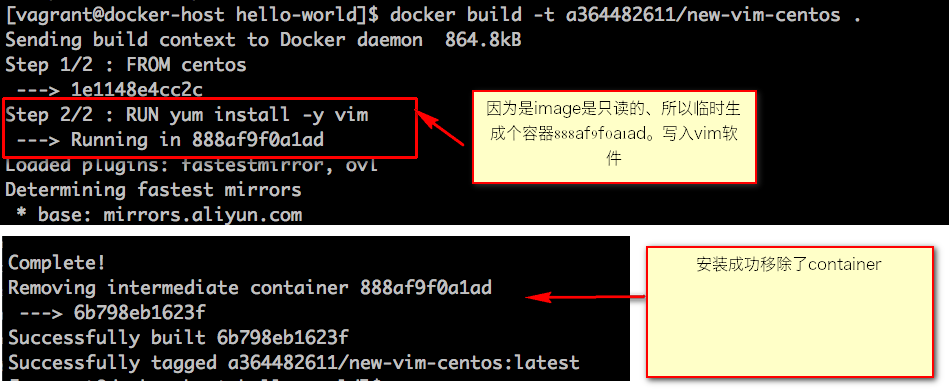
新建一个dockerfile内容如下
FROM centos
RUN yum install -y vim
退出、build一个image
docker build -t a364482611/new-vim-centos .

Dockerfile语法
Shell格式和Exec格式语法
shell格式
RUN apt-get install -y vim
ENV name Docker
CMD echo "hello docker"
ENTRYPOINT echo "hello $name"
使用shell格式输出变量
FROM centos
ENV name Docker
ENTRYPOINT echo "hello $name"
输出
[vagrant@docker-host hello-world]$ docker run test/hello
hello Docker
exec格式
RUN ["apt-get","install","-y","vim"]
ENV name Docker
CMD ["/bin/echo","hello docker"]
ENTPYPOINT ["/bin/echo","hello $name"]
exec使用时容易范的错误 如下
FROM centos
ENV name Docker
ENTRYPOINT ["/bin/echo","hello $name"]
输出
[vagrant@docker-host hello-world]$ docker run en/hello
hello $name
原因:是ENV $name变量是定义shell的语法;exec的方式 只是执行echo 命令。正确的方式如下
ENTRYPOINT ["/bin/bash","-c","echo hello $name"]
语法关键字
FROM
FROM scratch #制作base image 不依赖任何代码
FROM centos  #使用base image 使用centos作为依赖
FROM ubuntu:14.04 #指定了依赖的tag 版本
注:FROM尽量使用官方的image作为base image 为了安全
LABEL
标识作者信息和描述、类似代码的注释
LABEL maiatainer="a893797758@gmail.com"
LABEL version="1.0"
LABEL description="This is description"
RUN
执行命令并创建新的image layer
RUN yum update && yum install -y vim \ python-dev #反斜线换行
`RUN apt-get update && apt-get install -y perl \
pwgen --no-install-recommends && rm -rf /var/lib/apt/lists/*`
RUN /bin/bash -c 'source $HOME/.bashrc;echo $HOME'
因为每运行一个条命令、image上就生成一个container 最然会销毁。但避免无用分层。最好合并多条命令为一行~!
WORKDIR
类似于cd 进入要执行的目录。workdir没有的工作目录则会自动创建
WORKDIR /root
WORKDIR /test  #如果没有会自动创建test目录
WORKDIR demo
RUN pwd    #输出的结果应该是 /test/demo
注意:用户workdir,不要用RUN cd ! 尽量使用绝对目录!
ADD 和 COPY
ADD hello  /
# 把hello这个文件添加到image的根路径 (在docker自学笔记--image那里制作了image)
ADD test.tar.gz / @添加到根目录并解压
WORKDIR  /root
ADD hello test  # /root/test/hello
WORKDIR /root
copy hello test/注意:大部分情况,COPY优于ADD! ADD除了COPY还有而外功能(解压)!
添加远程文件/目录请使用curl或者wget!
ENV
尽量使用ENV增加可维护性
ENV MYSQL_VERSION 5.6 #设置产量
RUN apt-get install -y mysql-server="${MYSQL_VERSION}" \
&& rm -rf /var/lib/apt/lists/* #引用常量
VOLUME
存贮持久化映射的目录 docker run -v 的-v参数来设定
EXPOSE
暴露container端口
CMD
设置容器启动后默认执行的命令和参数。
如果docker run指定了其他命令,cmd命令被忽略
FROM centos
ENV name Docker
CMD echo "hello $name"
####################################
docker run [image]  #这时候image中的cmd会被执行  hello docker
docker run -it [image] /bin/bash #例如这样就不会输出
如果定义了多个CMD,只有最后一个会执行
ENTPYOINT
设置容器启动时运行的命令,让容器以应用程序或者服务的形式运行
不会被忽略,一定会执行
[vagrant@docker-host hello-world]$ docker run a364482611/cnetos-entrypoint /bin/bash
hello Docker
封装一个压力工具的命令行image
FROM ubuntu
RUN apt-get update && apt-get install -y stress
ENTRYPOINT ["/usr/bin/stress"]
CMD []
通过 ENTRYPOINT 的命令CMD [] 的方式 ,CMD来接受参数。封装了一个命令行工具
docker build -t a364482611/ubuntu-stress .
docker run -it a364482611/ubuntu-stress --vm 1 -v

发布自己的image
docker login 登录输入账号密码

提交到docker hub 注意 xxxx/如果提交 xxxx为自己账号名
docker push a364482611/hello-world:latest
###
[vagrant@docker-host hello-world]$ docker push a364482611/hello-world:latest
The push refers to repository [docker.io/a364482611/hello-world]
ec4d3bc51cad: Pushed
latest: digest: sha256:d5f506aeae6ca6bd8aeb6c4b3b766767ab07365086a192905e8c1e061b1aa865 size: 527
###
提交成功。这样其他用户就可以通过docker pull a364482611/hello-world 拉取了
搭建私有的registry不带web界面的github仓库
找到官网的registry的hub:传送门
在要搭建的主机上运行命令 (dockerhub的服务器) IP:192.168.100.12
docker run -d -p 5000:5000 --restart always --name registry registry:2
本机地址是192.168.138.138
再次build一下hello-world 区别是前缀的tag改成ip地址192.168.100.12
docker build -t 192.168.100.12:5000/hello-word .
如果 /etc/docker 没有daemon.json文件、那么添加并且加入内容
{
   "insecure-registries":["192.168.100.12:5000"]
}
并且在docker.service的启动文件上加上
vim /lib/systemd/system/docker.service

EnvironmentFile=/etc/docker/daemon.json
服务进行重启 然后进行push
docker push 192.168.100.12:5000/hello-word
通过官方api文档:传送门 查看私有的hub里面image推送成功了没有。

删除192.168.100.12:5000/hello-word从远程拉取
[root@docker-host ~]# docker images
REPOSITORY                       TAG                 IMAGE ID            CREATED             SIZE
192.168.100.12:5000/hello-word   latest              28a3781268de        About an hour ago   861kB
centos                           latest              1e1148e4cc2c        2 weeks ago         202MB
hello-world                      latest              4ab4c602aa5e        3 months ago        1.84kB
[root@docker-host ~]# docker image rm 28a3781268de
Untagged: 192.168.100.12:5000/hello-word:latest
Untagged: 192.168.100.12:5000/hello-word@sha256:d5f506aeae6ca6bd8aeb6c4b3b766767ab07365086a192905e8c1e061b1aa865
Deleted: sha256:28a3781268de24de45bd3a887138aa065117c8ec688a3e7f529c850465c06831
Deleted: sha256:931012ccedb36215cd1286c974fd1e89a3e6f8616124585674e5b3ad642a183e
Deleted: sha256:ec4d3bc51cad3dd0cb9b8f6873eb5de07f6930bdb063ca598a4c582820136d6b
docker pull 192.168.100.12:5000/hello-word

调试打包过程中出现的错误
#先定义一个app.py
#内容如下
from flask import Flask
app = Flask(__name__)
@app.route('/')
def hello():
    return "hello docker"
if __name__ == '__main__':
    app.run(host="0.0.0.0", port=5000)
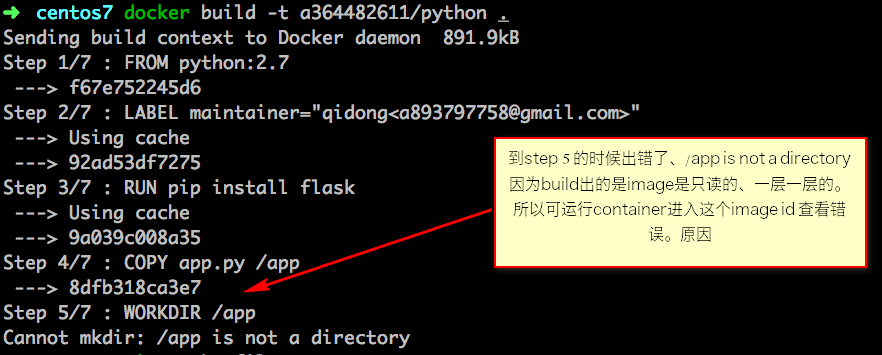
定义一下Docfile
FROM python:2.7
LABEL maintainer="qidong<a893797758@gmail.com>"
RUN pip install flask
COPY app.py /app
WORKDIR /app
EXPOSE 5000
CMD ["python", "app.py"]
Dockerfile和app.py放在同一个文件夹。

docker run  -it  8dfb318ca3e7 /bin/bash
#进入发现app不是个目录。找到错误 、更改为COPY app.py /app/
执行成功
后台执行
docker run -d a364482611/python
